Unlock Faster Cooking: The Power of Homemade Garlic Paste
Imagine a world where the pungent, aromatic foundation of countless dishes is always at your fingertips, ready in an instant. No more fumbling with stubborn garlic peels, no more sticky fingers, and no more last-minute mincing when you're racing against the clock. This culinary dream is not only possible but incredibly easy to achieve with homemade garlic paste. This simple yet revolutionary prep hack transforms your cooking experience, making weeknight dinners a breeze and infusing every meal with vibrant, fresh flavor.
If you've ever wondered how to make garlic paste that's superior to store-bought varieties, more cost-effective, and a genuine game-changer for your kitchen efficiency, you're in the right place. We'll guide you through the effortless process, share clever storage solutions, and reveal why this aromatic paste deserves a permanent spot in your meal prep routine.
The Undeniable Advantages of Homemade Garlic Paste
While the allure of convenience often leads us to pre-packaged alternatives, there's a compelling case for making your own garlic paste at home. The benefits extend far beyond just saving a few minutes:
- Unmatched Freshness and Flavor: Store-bought garlic pastes often contain preservatives and lack the bright, pungent punch of freshly processed garlic. Homemade paste retains all the essential oils and robust flavor that elevate your dishes from good to extraordinary. You taste the true essence of garlic, not a muted imitation.
- Significant Time Savings: This is arguably the biggest draw. Peeling and mincing garlic for every meal, especially in recipes calling for multiple cloves, can be tedious. Having a jar of paste ready means you can skip this step entirely, slashing prep time and making complex recipes more approachable on busy days. It's the ultimate weeknight hack!
- Cost-Effective: Buying whole garlic heads is almost always cheaper per pound than pre-minced garlic or commercial garlic paste. By making your own in bulk, you get more quantity for your money, making it a budget-friendly addition to your kitchen arsenal.
- Complete Control Over Ingredients: When you make it yourself, you dictate what goes in. No artificial flavors, colors, or unwanted additives – just fresh garlic and high-quality oil. This is especially appealing for those with dietary restrictions or a preference for clean eating.
- Reduced Waste: Often, garlic cloves start to sprout or dry out before you can use them all. Converting an entire head (or several) into paste ensures you utilize every usable clove, minimizing food waste.
Mastering the Art: A Step-by-Step Guide on How to Make Garlic Paste
Creating your own garlic paste is surprisingly simple, requiring minimal ingredients and equipment. The most labor-intensive part is often the peeling, but even that can be expedited with a few clever tricks!
What You'll Need:
- Fresh Garlic Heads: Look for firm, plump heads without green sprouts or soft spots. The fresher the garlic, the better your paste will taste. A single large head typically yields 10-12 cloves.
- Quality Oil: Extra Virgin Olive Oil is a popular choice for its rich flavor and smooth texture, which complements garlic beautifully. However, neutral-flavored oils like avocado, canola, or grapeseed oil are excellent alternatives, especially if you want the garlic flavor to be completely unadulterated or plan to use the paste in high-heat cooking where olive oil might smoke. Avoid strongly flavored oils that could overpower the garlic.
- Pinch of Salt (Optional): A little coarse salt can aid in breaking down the garlic, especially if you're using a manual method, and can act as a mild preservative.
Equipment:
- Food Processor or High-Speed Blender: This is the easiest and most efficient tool for achieving a smooth, uniform paste.
- Alternatives (if no blender/processor):
- Mortar and Pestle: For a more traditional, rustic paste with amazing texture.
- Sharp Knife and Cutting Board: Finely mince the peeled garlic, then sprinkle with a pinch of coarse salt. Use the flat side of your knife to smash and drag the garlic along the board until a paste forms. Then, mix in your oil.
The Easy Process:
- Peel the Garlic: This is often the trickiest part.
- Quick Method 1: Separate cloves, place them in a sturdy bowl, cover with another bowl of the same size, and shake vigorously for 15-20 seconds. Many peels will come right off.
- Quick Method 2: Slightly smash each clove with the flat side of your knife to loosen the skin.
- Quick Method 3: Soak cloves in hot water for a few minutes; the skins will slip right off.
- Combine Ingredients: Place the peeled garlic cloves into your food processor or blender. Add a small amount of your chosen oil. Start with less oil than you think you'll need; you can always add more.
- Blend to Perfection: Process the garlic and oil, scraping down the sides of the bowl as needed. Continue blending until a completely smooth paste forms. If the mixture seems too thick or the blades are struggling, add a tiny bit more oil until you reach your desired consistency. Avoid adding too much oil, as this can make the paste watery.
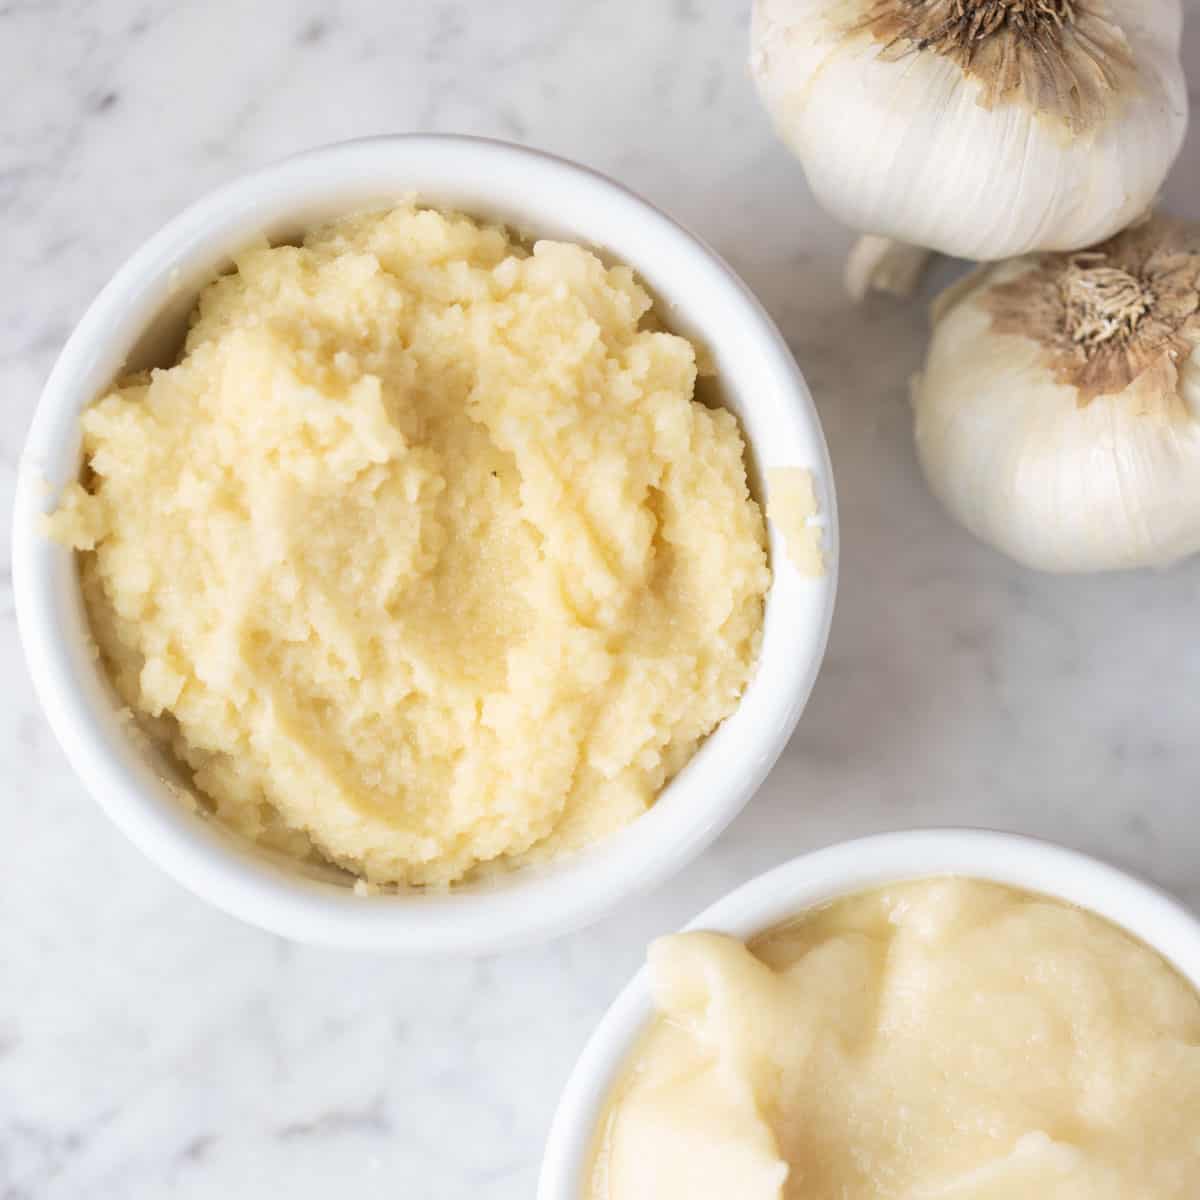
- Check Consistency: The paste should be uniform, free of large chunks, and spreadable.
And just like that, you've unlocked a secret weapon for faster, more flavorful cooking! For a more in-depth visual guide and specific ratios, check out our companion article: Make Your Own Garlic Paste: Quick & Easy Recipe Guide.
Storage Solutions: Keeping Your Garlic Paste Fresh
One of the greatest benefits of homemade garlic paste is its make-ahead potential. Proper storage is key to extending its shelf life and ensuring safety.
Refrigeration:
- Airtight Container: Transfer your freshly made garlic paste into a clean, airtight glass jar or container.
- Oil Layer: For an extra layer of preservation and to prevent oxidation, pour a thin layer of olive oil over the top of the paste before sealing. This creates a barrier that keeps air out.
- Shelf Life: Stored correctly in the refrigerator, homemade garlic paste can last for about 1 to 2 weeks. Always use a clean spoon each time you scoop out paste to prevent contamination.
Freezing: The Ultimate Long-Term Solution
For even longer storage, freezing is your best bet and incredibly convenient:
- Ice Cube Trays: Spoon the garlic paste into standard ice cube trays. Each cube typically holds about ½ to 1 tablespoon, making for perfect pre-portioned servings. This is ideal for recipes that call for specific amounts.
- Flash Freeze: Place the trays in the freezer until the cubes are solid (usually a few hours).
- Transfer to Bags: Once frozen solid, pop the garlic paste cubes out of the trays and transfer them to freezer-safe bags or containers. Label with the date.
- Shelf Life: Frozen garlic paste can last for 3 to 6 months, or even longer without significant loss of flavor.
- Usage Tip: The best part? You don't need to thaw frozen garlic paste before using it! Simply drop a frozen cube directly into your hot pan, soup, or sauce, and it will melt and incorporate seamlessly into your dish.
Important Safety Note:
Garlic in oil, when stored improperly at room temperature, can pose a risk of botulism, a serious foodborne illness. While freshly made paste is safe to be at room temperature for a couple of hours, it's crucial to always store homemade garlic paste in the refrigerator or freezer for longer preservation. Never store garlic in oil at room temperature for extended periods.
To learn more about extending the life of your culinary creations and maximizing your kitchen efficiency, explore our detailed guide: Homemade Garlic Paste: Store Freshness, Save Time & Money.
Beyond the Basics: Tips, Tricks, and Creative Uses
- Garlic Paste vs. Minced Garlic: Remember that garlic paste is more concentrated and its flavor disperses more readily than minced garlic. A general rule of thumb is that one garlic clove is roughly equivalent to ½ teaspoon of garlic paste. If a recipe calls for minced garlic, use slightly less paste (e.g., if it calls for 1 tsp minced, use ¾ tsp paste) and adjust to your taste.
- Flavor Infusions: Don't stop at just garlic! You can create compound pastes by blending ginger with garlic for an aromatic ginger-garlic paste (essential in many Indian and Asian cuisines), or add fresh herbs like cilantro or parsley, or even a touch of chili for a spicy kick.
- Versatile Applications: Homemade garlic paste is a secret weapon for almost any savory dish:
- Marinades: Effortlessly infuse meats, poultry, or tofu.
- Stir-fries & Curries: A quick base for an explosion of flavor.
- Soups & Sauces: Adds depth and warmth without the fuss.
- Roasting Vegetables: Toss with oil and vegetables for an easy flavor boost.
- Garlic Bread: Spread directly onto bread, sprinkle with herbs, and bake.
- Dips & Spreads: Mix into hummus, yogurt dips, or cream cheese.
- Adjusting Consistency: If your paste is too thick, add more oil a teaspoon at a time. If it's too thin, you may have used too much oil; you can try adding a few more cloves of garlic or using it as is in liquid-heavy recipes.
Conclusion
Embracing the power of homemade garlic paste is more than just a culinary convenience; it's a step towards more flavorful, efficient, and enjoyable cooking. The minimal effort involved in learning how to make garlic paste pays dividends in saved time, superior taste, and greater control over your ingredients. Say goodbye to tedious peeling and chopping and hello to a kitchen hack that will truly transform your everyday meals. Give it a try this weekend, and experience the joy of unlocking faster, fresher cooking!
